
3 quick tips to make your app even better
1. Add User Roles
2. Add Users
3. Set Fields and Access
Tip #1. User Roles and Permissions
You can add users and assign different roles according to your requirements.
Step 1
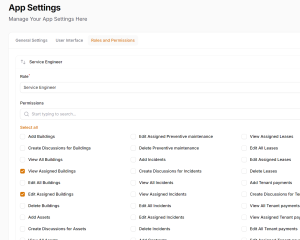
1. Go to the App Settings section in the left sidebar and you’ll see the tab named Roles and Permissions.
Step 2
You can define the name of the user, email, and password to access the platform.
Step 3
Don’t forget to assign the proper user role we created in the previous step.
Tip #2. Users
Users can be added from the Users menu item in the left sidebar.
Step 1
Click on the New Team User button to create your first user.
Step 2
Here, you can create or edit existing roles for your application.
If you’d like to rename your app, go to the General Settings tab to change the app name.
Step 3
Feel free to check/uncheck allowed permissions for each user role.
Tip #3. Fields, Models and User Role Fields
At this point, you know much better how to work with the app.
This step is required if you would like to fine-tune your app.
Let’s break it into two sub-steps
Step 1. Rename and Add Fields
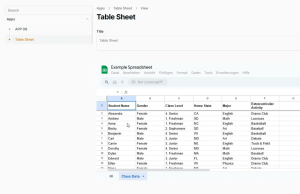
1. To add new fields to your models or rename existing ones, go to the Data Models menu item.
2. Click on the model row you’d like to change.
3. Voila! Now you can rename labels, set the proper data type, or even add a new field to your model.
4. Don’t forget to hit the Save button to apply changes.
Step 2. Configure Who Can See or Edit Fields
1. To do that, click on the three dots near the trash icon and you’ll see a popup where you can select permissions for each user role you created in the previous step.
2. Users can either see or edit fields. Note that edit permission includes view permission.
Feel free to review other settings in this popup. It contains useful settings you can change later.
Questions? Comments?
Let us know, our product team is ready to help.